Pages

Sunday, May 20, 2012

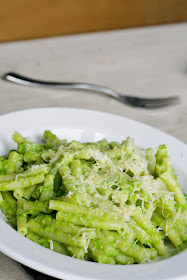
Maccaroni and peas

I made this recipe a while ago already, but never wrote a post about it for some reason. 
That's the title of his vegetarian cook book from the River Cottage series.. 
I do not own the book, but watched a video where he prepared it on the River Cottage-website and instantly wanted to try it, myself.

 It's really easy to make and I love the color of the bright green pea sauce. 


Here is what you need: 


500g green peas (4 cups), frozen or even better, fresh
500g dry maccaroni (2 cups)
50g of butter 
1 garlic clove, peeled and minced (I'd use 2 cloves!)

25g of Parmesan cheese, coarsely grated (1/2 cup) plus more for serving
fine sea salt and freshly ground black pepper
chopped fresh flat leaf parsley for garnish (something I didn't have...)


Directions:

Bring a large pot of lightly salted water to the boil. Add the pasta and cook according to the package directions while you make the sauce. 

Heat the butter in a small pan. Add the garlic and cook gently for a few minutes without colouring. 


Put the peas in a separate pan, cover with water, bring to the boil and simmer until just tender. 
This should only take a couple of minutes. 
Drain, reserving the cooking liquid. 


Put half of the peas into a blender along with 6 tbsp of the cooking water, and the melted butter and garlic. Add the cheese. Blitz until you have a smooth and loose puree, adding a bit more of the pea cooking water if needed. Combine with the whole peas and season to taste with salt and pepper.


Drain the pasta as soon as it is ready and toss immediately with the hot pea sauce. 


Serve topped with a hearty grinding of black pepper, some more grated Parmesan and a garnish of chopped flat leaf parsley.


I didn't have parsley, but it still looks really pretty and all lush and green...


Notes:

Only thing that I would do different than Hugh: add more spice!
I thought it was a little bland. He is British after all...

Therefore next time I would just add more garlic, pepper, salt and parmesan, and maybe even some chopped onions to sautée with the garlic. Roasted pine nuts or almond slivers to sprinkle over the dish could be pretty tasty, as well...

Or even better: MINT! Mint and peas is a phenomenal combination! Chopped mint added to the puree with a teaspoon of sugar to add some kick to the peas...yum!
Why did I not think of this earlier?

And those of you who need their meat, could also add some fried bacon or ham cubes...
That way it gets a more savory, as well. 


Wednesday, May 16, 2012

Green asparagus & strawberry salad with arugula

Just a quick post, since I'm super busy getting everything ready before leaving for Canada next week.

I made this green asparagus & strawberry salad last night. I didn't  have high hopes, but have to say it turned out really good. Both go very well together and a the arugula adds a nice spicyness.

Look closely and you may spot some of the hollandaise sauce and balsamico...

I sliced the strawberries and had them marinate for a couple of minutes in a dash of 1/2 to 1 teaspoon of sugar and black pepper. The amount of sugar depends on how many strawberries, how sweet they are already and whatever you prefer. 

In the meantime I steamed the asparagus and wahsed the arugula.
Salt the asparagus, then pour asparagus, strawberries and arugula in a bowl and mix. 

Season everything with salt and pepper, if necessary.

I made my quick sauce hollandaise to pour over the salad, not the whole amount, though, that would have been too much...half maybe, or even less (you can find the recipe here!). Together with balsamico vinegar sprinkled over it in the end it serves as a nice and rich salad dressing. You can also just use olive oil instead and add some grated parmesan or gruyere cheese. 
That is a little lighter, easier and less time consuming to prepare.

Enjoy, your ultimate spring salad!

Notes: 
I already knew that strawberries taste really well with balsamico and/or pepper. But, boy, it's the first time I noticed how nicely they taste with a bit of salt...


Monday, May 7, 2012

Standing Rib Roast

Hey everyone,

Last saturday Wil and I celebrated our anniversary...or better anniversaries! Three years ago Wil stepped into the bar where I used to work at this point. That's how we met... And last year around the same time Wil proposed to me in the most beautiful vineyard in France.

Le feast


We still had a bottle of wine of this particular vineyard, a 2007 "Chateau la Nerthe" from Chateau-Neuf Du Pape, as well as a bottle of the vineyard we went after the proposal "Domaine Le Pointu", a family business run in its third generation with really good wine and the nicest and most generous people.


Les wines

We decided that this would be the perfect day to empty these two very special bottles, and what better than to pair them with a giant standing Rib Roast/Cote Du Boeuf, seared on the barbecue and finished in the oven until medium rare?

Le meat

We went to our favorite market place butcher here in Berlin, Prenzlauer Berg, and asked him to dry-age around 2 kilos of rib eye for 4 weeks.
When we picked it up a couple of weeks later it turned out to  be "slightly" more than 2 kilos and we went home with a dinosauresque monster piece of 2.7 kg/ 6 lbs of beautifully aged meat for 32.50€ (!!!).

Here is the proof: it was HUGE!

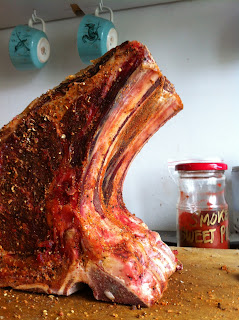
Back home we unpacked the rib-roast and let it reach room temperature. We seasoned it with a spice rub of olive oil, smoked paprika powder, shanghai pepper, thyme and salt.

Smoked sweet paprika: my new favorite spice for all kinds of dishes and any kind of meat!


Before firing up the barbecue (with charcoal for more heat!)
we opened the wine bottles to allow the wine to breathe.
Once the barbecue was hot enough, we seared the rib-eye for 3-4 minutes each side.

We tied the roast with some strings to prevent it from bending while searing.
After that we placed the roast in a deep pan, bones facing down with the whole roast standing up, so that the heat could get everywhere evenly.  We surrounded it by some rosemary twigs, garlic cloves and butter cubes and cooked it for another 1 hour and 15 minutes at around 130°-150°C.

Wurst Cook Ever with our (now) standing rib roast!


Unfortunately that's the lowest our gas oven gets. If you can cook it at a lower temperature, go ahead. 
It'll take longer, probably two to three hours, depending on the temperature of course. 
But it will be even more tender.
A meat thermometer definitely is a good investment here.

meat thermometer...

For medium-rare the temperature in the center needs to be at 55-60°C. Therefore once the meat reaches 50-52° (rare), pull it out, wrap it in aluminium foil and let it rest for around 10 minutes. While resting more heat will get inside the beef which in the end will heat it up a few more degrees to turn it medium-rare.

Most of the weight comes from the giant bone...
Just like the fat, the bone adds some really nice flavors, especially when barbecued.

Look at how juicy, tender and pink it is! Nom nom...
The white stuff is connective tissue. 
Unfortunately Rib-roasts have a fair bit of that chewy stuff. Just cut it out. 
You don't want to eat that...


By adding a bit of wine to the drippings and reducing them over heat we made a nicely rich sauce to serve together with the sliced meat.

the meat served with some caprese salad

The roast had a nice beefy flavor and tasted delicious. It was really tender and juicy and the two wines (grenache, syrah) were a perfect fit, as well!

Dry-aging for four weeks instead of two or three definitely makes a difference. The longer the meat ages the more water it loses and the more the flavors can concentrate.
Some even swear by dry aging beef for six weeks to get the maximum flavor out of it.

We drank all the wine, but still have plenty of leftover roast for sandwiches...

Notes:

1. I don't fully agree with the common idea to not salt the meat before cooking. I think it really depends on the kind of meat. Thin steaks and lean filets, ok, don't salt them, or at least not that much. 
But if it is a thick piece and/or the meat has some fat, don't worry about that. 
The fat will prevent it from drying out.

2. I also prefer to rub the meat with spices and herbs before searing. That way the spices have the chance to soak a little bit into the meat. I also really really like the slightly burnt flavor, that this creates...